 Before starting the demolition, plug all engine openings with clean rags, and then wash it from the outside. The location of all moving parts should also be marked (without damaging the working and contact surfaces). Set the individual parts aside like this, so that it is not possible to replace them.
■ Drain the engine oil.
■ Attach the motor to the stand, using handles 1861001231 (from the side of the flywheel) and 1861001032 (on the timing drive side).
■ Disassemble the following parts:
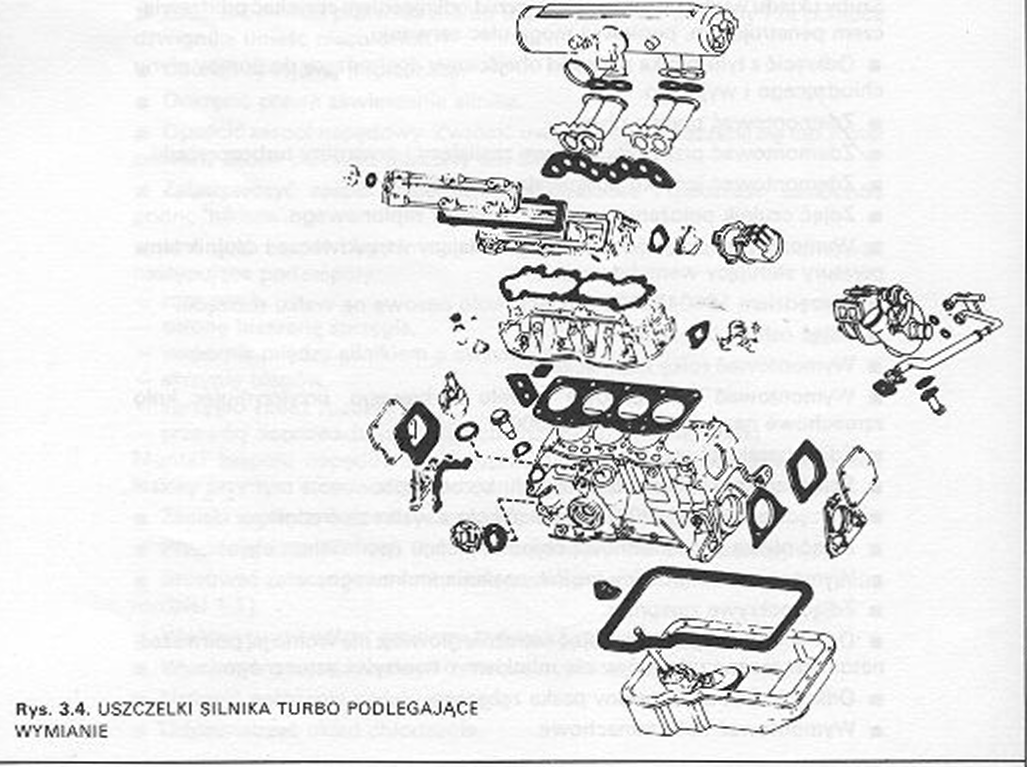
– ignition distributor with wires,
– Auxiliary injection air shutter with a hose leading to the intake manifold.
– fuselage oil separator.
– oil filter,
– oil pressure sensor,
– toothed belt cover.
– alternator and V-belt.
■ Unscrew the complete intake manifold from the cylinder head.
■ Remove the heat shield between the intake and exhaust manifolds.
■ Remove exhaust manifold with turbocharger.
■ Remove the heat shield from the turbocharger outlet side.
attention!
The exhaust system bolts should be sprayed with penetrating rust dust before unscrewing, because they can break.
■ At the rear of the engine, unscrew the bypass line to the coolant pump and remove it.
■ Remove the fluid pump.
■ Remove the turbocharger oil supply and return lines.
■ Remove the axle shaft support bearing.
■ Remove the ZZ position sensor from the ignition system.
■ Remove the fuel line feeding the injectors and the temperature sensor that controls the fan.
■ A tool 1860473000 unscrew the pulley on the camshaft.
■ Remove the cover plate.
■ Remove the tensioner pulley.
■ Remove the pulley from the crankshaft, holding the flywheel with a tool 1867029000.
■ Remove the toothed belt.
■ Pull the belt sprocket off the crankshaft.
■ A tool 1860473000 pull the pulley off the lay shaft.
■ Remove the oil cooler connection plate (under the oil filter).
■ Remove the knock sensor from the cylinder head.
■ Remove the valve cover.
■ Unscrew the cylinder head bolts and carefully remove the cylinder head; it must not be undermined, but you can hit it with a plastic hammer.
■ Unscrew the toothed belt cover bracket.
■ Remove the flywheel.
■ Remove the oil pump drive cover and pull out the oil pump driving wheel.
■ Remove the intermediate shaft collar and pull out the shaft. Crank the engine up.
■ Remove the oil pan.
■ Unscrew the oil pump at the flange and remove it.
■ Remove the dipstick tube.
■ Unscrew the O-ring covers on both sides of the casing.
■ Unscrew the nuts of the connecting rod caps and remove the caps, putting aside yes, so that they can be put back together with the same connecting rods.
■ Remove the pistons with connecting rods from below (from the head side). Before that, remove any edge from the carbon deposit. Immediately connect the connecting rods with the caps (pay attention to the figures stamped on the side which indicate the consecutive numbers of the cylinders).
■ Unscrew the nuts of the main shell covers and remove the covers.
■ Remove the crankshaft.
■ Bushing lids are engraved with numbers identifying their fuselage seat affiliation. The figures must be legible when installed, when viewed from the timing drive end.
After disassembling the engine, thoroughly wash and degrease all parts. The control test pieces must be at a temperature of 20 ° C. The main and crank shells are subject to visual inspection only, because they must be replaced with new ones.
Assembling the engine
After verification and possible replacement of parts, you can start assembling the engine, by following the previous steps in the reverse order.