The cylinder head 1300 Turbo is a two-piece die-cast aluminum alloy.
The camshaft is mounted in a separate housing together with the valve lifters. An ignition distributor flange is bolted to the face of the head.
The head can be removed without removing the motor.
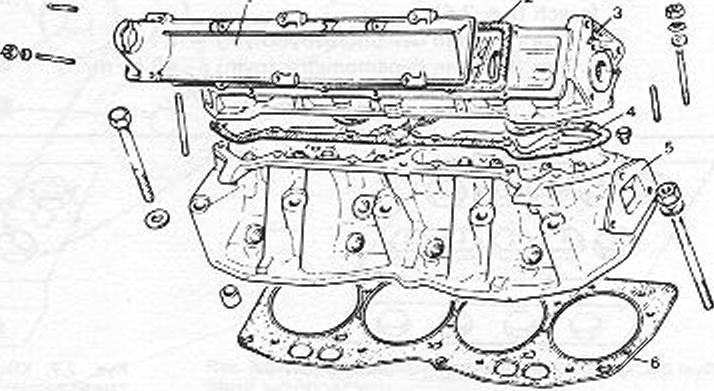 Lynx. 3.5. HEAD
1 – valve cover,
2 – seal.
3 – camshaft housing.
4 – seal, 5 – head,
6 - heads gasket
Removal / installation of the head
Only then can the head be removed, when the engine temperature drops below 40 C!
■ Drain the coolant partially.
■ Disconnect the battery.
■ Remove the complete air filter.
■ Remove the air cooler rubber inlet hose.
■ Disconnect the ground cable at the left hand head” and pull it out of the holder.
■ Disconnect the ground cable at the head.
■ Pull out the plugs of the injectors.
■ Disconnect the fuel lines.
■ Disconnect the coolant hose from the right-hand cylinder head.
■ Disconnect the rubber hose from the secondary air shutter on the intake side.
■ Pull out the electric wire of the high pressure switch in the inlet pipe.
■ Pull the air hose out of the injector tube.
■ Unscrew the turbocharger flange from the exhaust manifold, disconnect the manifold holder at the engine block and carefully separate the tube compressor from the manifold. The turbocharger remains connected to the lubrication and cooling system.
■ Remove the toothed belt cover.
■ Turn the crankshaft, "Ripping” set marks on gears (see fig. 3.8). To turn on 5. gear and set the emergency brake.
■ Loosen the toothed belt tensioner roller and remove the belt.
■ Remove the plug from the knock sensor in the cylinder head.
■ Unscrew the cylinder head bolts and carefully lift the cylinder head together with the intake and exhaust manifolds.
attention!
Remove any coolant from the cylinders immediately. Carry out further disassembly of the head on a workbench, paying attention, in order not to damage the contact surface.
■ Remove the collectors.
■ Remove the fluid temperature sensor and secondary air shutter.
■ Remove the injector aeration tube with the fan heat switch.
■ Unscrew the thermostat housing.
The head assembly takes place in the reverse order. Please observe the following instructions.
■ Replace all gaskets with new ones.
■ Install all overpressure suction lines very carefully and tightly. Replace damaged ones, even slightly, clamps for these connections.
■ Observe the prescribed tightening torques (see chapter 1.1).
■ Screws, Thoroughly lubricate the nuts and washers with oil and leave at least 30 minutes to drip off. This is especially true for the head mounting.
■ Degrease the contact surface of the head and the fuselage with tetrachlorethylene. Take the head gasket out of the packaging just before installation (chemical reaction with air).
■ Place the gasket with the inscription "ALTO” up.
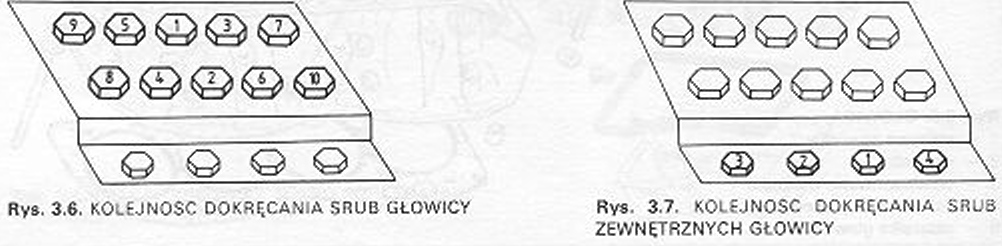
■ Put the head down immediately, insert the bolts and tighten them in the following steps (Lynx. 3.6):
1. phase (with a torque wrench) 2 Nm,
2. phase (with a torque wrench) – 40 Nm,
3. phase (with an assembly key) – by an angle of 90 °,
4. phase (with an assembly key) - by an angle of 90 °.
The outer bolts are torque tightened 30 Nm according to the sequence shown in the figure 3.7.